Posts

Controlling an Arduino Smart Car with TouchDesigner

Image
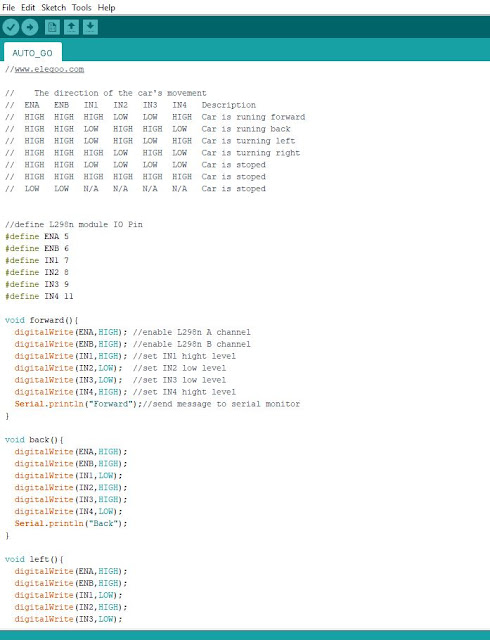
  Controlling an Arduino Smart Car with TouchDesigner   TouchDesigner can be used as an interface for any Arduino setup.     Here we analyze source code provided in a STEM kit for beginners, create our own code that we can trigger from a serial connection and create a controller in TouchDesigner.                 To follow the video tutorial step by step you will need the ELEGOO UNO R3 Project Smart Robot Car Kit V 3.0 Plus, which can be found here .   I encourage you to take your own Arduino project and make your own interface using this as a rough guide.   A more in depth video tutorial can be found here .   Steps for any Arduino/TouchDesigner project: 1.        Connect the arduino to touchdesigner 2.        Understand the Arduino code 3.        Write new Arduino code we can trigger from serial port 4.        Trigger Arduino code from Touchdesigner 5.        Create a remote control interface   Materials: 1.        TouchDesigner 2.        Elegoo Smart Car

Using an Arduino with Touch Designer – Beginner exploration

Image
Working With the Derivative Wiki: There are videos that go along with each section: Sending data from the Arduino Receiving data from the Arduino Controlling an RGB LED with TouchDesigner Sending data from the Arduino : Pre-reqs: Some experience with simple Arduino projects like the one that comes with this kit:  Elegoo Uno Project Super Starter Kit Some experience using TouchDesigner .  Have both touchDesigner and Arduino installed on computer already ( I will not be including these steps. Steps : Connect an Arduino to your computer.  (Don’t overthink it.  Just the Arduino.  Absolutely nothing needs to be attached for the example on the wiki to work.)   Open a new Arduino sketch and paste in the simple sketch that Derivative supplies for you on their wiki page:   https://www.derivative.ca/wiki088/index.php?title=Arduino Upload the sketch to the Arduino. Open a new TouchDesigner file. Add a Serial DAT.   Ensure the Port parameter is set to the proper port.  

Building an 8x8x8 LED Cube from an Ebay Kit

Image
Building an 8x8x8 LED Cube from an Ebay Kit: Back in 2017 I decided to buy a kit and build an led cube.  I felt like soldering and I wanted some circuit board experience.  Eventually, I want to reprogram the matrix with a shortest path algorithm.  I think it would help in visualizing 3d matrixes and seeing a link between code and hardware.  I have not gotten to that part of the project, yet.  This blog is a quick recount of my experience.  There is a video of the final project on YouTube . Goal:          Stretch my soldering muscles           Gain experience in: o    Circuit board assembly o    Micro controllers o    Low voltage electronics Help me understand how microcontrollers are programmed and used.   Kit I bought: 3D Squared DIY Kit 8x8x8 LED Cube White LED Blue Light BoardElectronic OS843 This is not the exact kit (I bought mine two years ago), but it’s pretty much the same.  Don't expect an instruction manual. Tutorial